Astrill Setup Manual:How to configure DNS on network adapter on Windows 10: Difference between revisions
(Created page with "Open Control Panel. Click on Network and Internet. Click on Network and Sharing Center. On the left pane, click on Change adapter settings.") |
No edit summary |
||
| Line 1: | Line 1: | ||
== '''Step 1''' == | |||
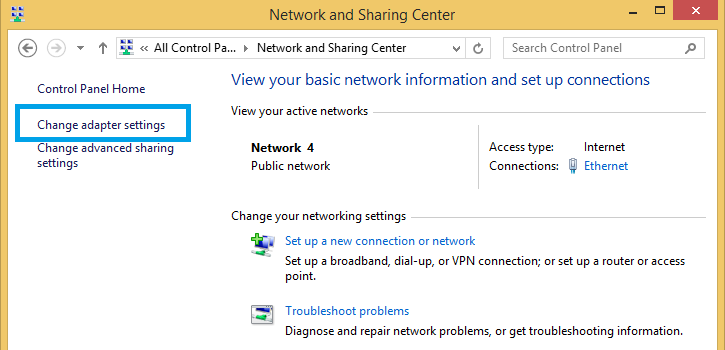
Open Control Panel, click on Network and Internet then click on '''Network and Sharing Center'''. | |||
On the left pane, click on '''Change adapter settings'''. | |||
[[File:Win8-dns2.png|border]] | |||
== '''Step 2''' == | |||
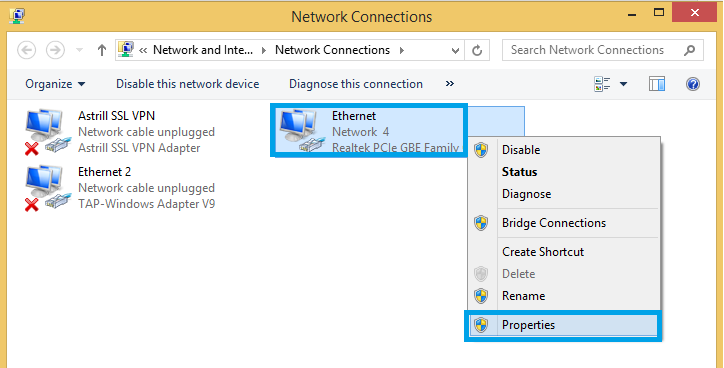
Right-click on your '''active internet connection''' (this may be "Ethernet", "Wireless Network Connection" or "Local Area Connection" depending on how your computer is set up) and select '''Properties'''. | |||
[[File:Win8-dns3.png|border]] | |||
== '''Step 3''' == | |||
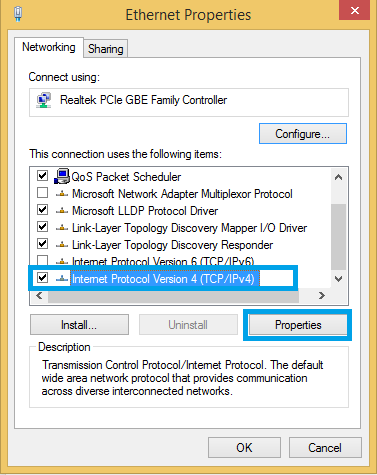
In the Networking tab, click once on '''Internet Protocol Version 4 (TCP/IPv4)''' to highlight it, and then click '''Properties'''. | |||
[[File:Win8-dns4.png|border]] | |||
== '''Step 4''' == | |||
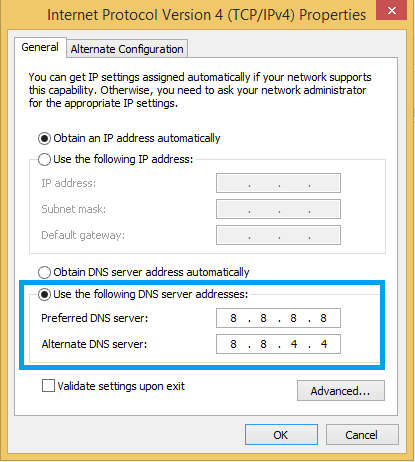
Select '''Use the following DNS server addresses''' and then enter the following: | |||
Preferred DNS server: 8.8.8.8 | |||
Alternate DNS server: 8.8.4.4 | |||
Then click '''OK'''. | |||
[[File:Win8-dns5.png|border]] | |||
== '''Step 5''' == | |||
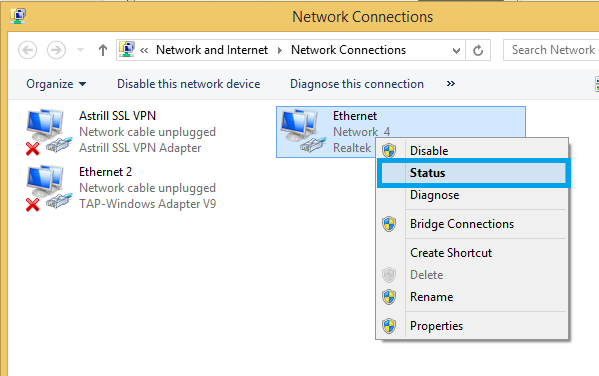
To confirm if the DNS server addresses is already set, right-click on your '''active internet connection''' again and select '''Status'''. | |||
[[File:Win8-dns6.png|border]] | |||
== '''Step 6''' == | |||
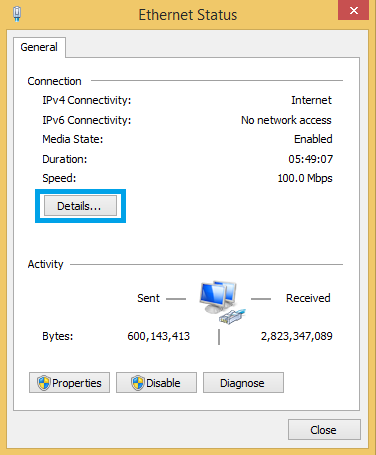
Click on '''Details...'''. | |||
[[File:Win8-dns7.png|border]] | |||
== '''Step 7''' == | |||
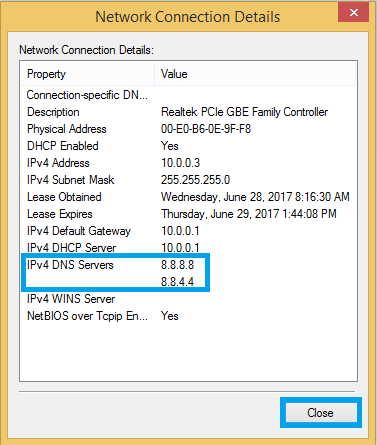
Under '''Network Connection Details''', you will see 8.8.8.8 and 8.8.4.4 as DNS servers for IPv4. This is a confirmation that DNS has been set. | |||
You can click on '''Close''' button now. | |||
[[File:Win8-dns8.png|border]] | |||
Revision as of 07:30, 28 June 2017
Step 1
Open Control Panel, click on Network and Internet then click on Network and Sharing Center.
On the left pane, click on Change adapter settings.
Step 2
Right-click on your active internet connection (this may be "Ethernet", "Wireless Network Connection" or "Local Area Connection" depending on how your computer is set up) and select Properties.
Step 3
In the Networking tab, click once on Internet Protocol Version 4 (TCP/IPv4) to highlight it, and then click Properties.
Step 4
Select Use the following DNS server addresses and then enter the following:
Preferred DNS server: 8.8.8.8 Alternate DNS server: 8.8.4.4
Then click OK.
Step 5
To confirm if the DNS server addresses is already set, right-click on your active internet connection again and select Status.
Step 6
Click on Details....
Step 7
Under Network Connection Details, you will see 8.8.8.8 and 8.8.4.4 as DNS servers for IPv4. This is a confirmation that DNS has been set.
You can click on Close button now.
