Astrill Setup Manual:How to configure DNS on network adapter on Windows Vista: Difference between revisions
Jump to navigation
Jump to search
No edit summary |
No edit summary |
||
| (3 intermediate revisions by 2 users not shown) | |||
| Line 2: | Line 2: | ||
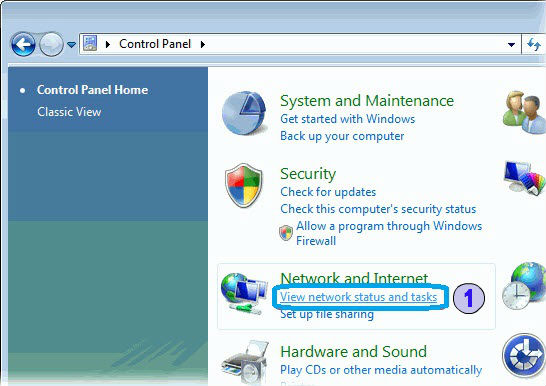
Click the Start-up menu, choose Control Panel and under '''Network and Internet''' click the '''View network status and tasks''' link. | |||
[[File:Vista-dns1.jpg|border]] | |||
== STEP 2 - Manage Network Connections == | |||
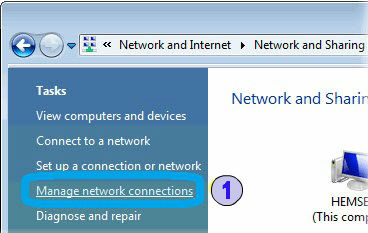
A new window will appear the click on '''Manage network connections''' | |||
== STEP | |||
[[File:Vista-dns2.jpg|border]] | |||
== STEP 3 - Network Adapter Propeties == | |||
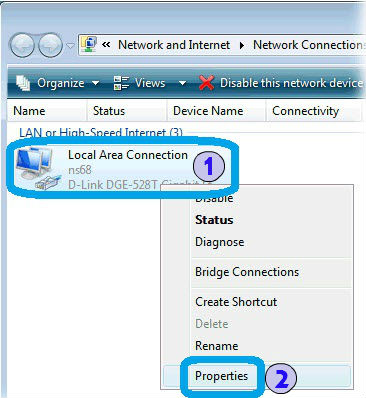
Right click on network adapter connected to the internet. | |||
And then click on '''Properties'''. | |||
[[File:Vista-dns3.jpg|border]] | |||
| Line 26: | Line 35: | ||
== STEP | == STEP 4 - Internet Protocol == | ||
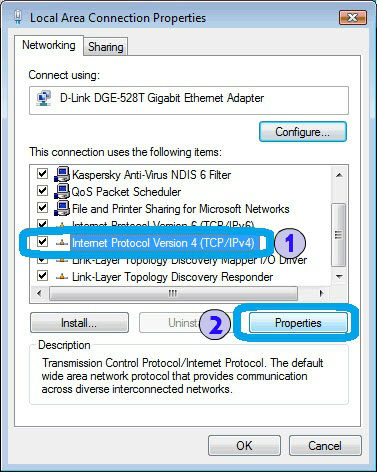
On Properties window, in '''General''' tab, select '''Internet Protocol Version 4 (TCP/IPv4)'''. | |||
Then click on '''Properties''' button. | |||
[[File:Vista-dns4.jpg|border]] | |||
== STEP 5 - Internet Protocol Properties == | |||
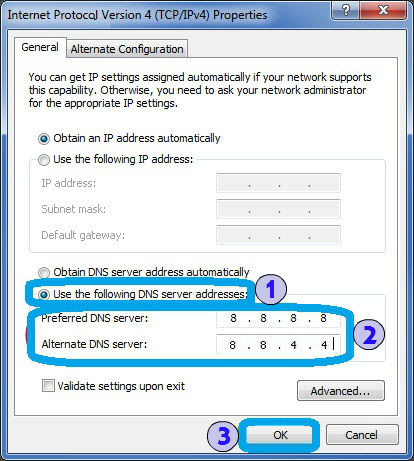
Select '''Use the following DNS server addresses''' option. | |||
Type in '''8.8.8.8''', and '''8.8.4.4''' just like on the screen above. | |||
When you are done click on '''OK''', and then click on '''OK''' again. | |||
[[File:Vista-dns5.jpg|border]] | |||
Latest revision as of 08:28, 26 June 2017
STEP 1 - Network and Internet
Click the Start-up menu, choose Control Panel and under Network and Internet click the View network status and tasks link.
STEP 2 - Manage Network Connections
A new window will appear the click on Manage network connections
STEP 3 - Network Adapter Propeties
Right click on network adapter connected to the internet.
And then click on Properties.
STEP 4 - Internet Protocol
On Properties window, in General tab, select Internet Protocol Version 4 (TCP/IPv4).
Then click on Properties button.
STEP 5 - Internet Protocol Properties
Select Use the following DNS server addresses option.
Type in 8.8.8.8, and 8.8.4.4 just like on the screen above.
When you are done click on OK, and then click on OK again.
