Astrill Setup Manual:How to configure L2TP/IPSEC with Windows built-in client on Windows 7: Difference between revisions
(Created page with "Take screenshots and explain steps. Ask Jovica or Matt if you need help with anything. Also you can search on Google to see examples for your article.") |
No edit summary |
||
| (15 intermediate revisions by 2 users not shown) | |||
| Line 1: | Line 1: | ||
<div style="text-align:center"><p style="font-size:50px;color:red">Attention! L2TP/IPSEC protocol won't be supported by Astrill after 1st January, 2021.</p> </div> | |||
== STEP 1 == | |||
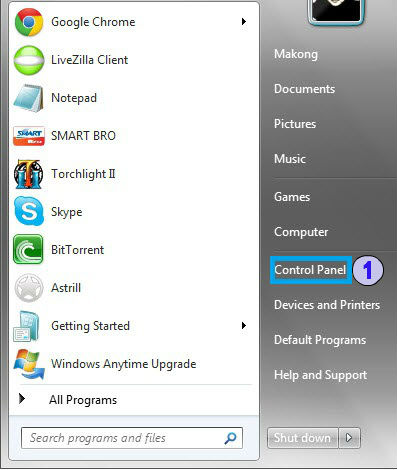
Click '''Start''' button, then select '''Control Panel''' from the menu. | |||
[[File:Win7-l2tp1.jpg|border]] | |||
== STEP 2 == | |||
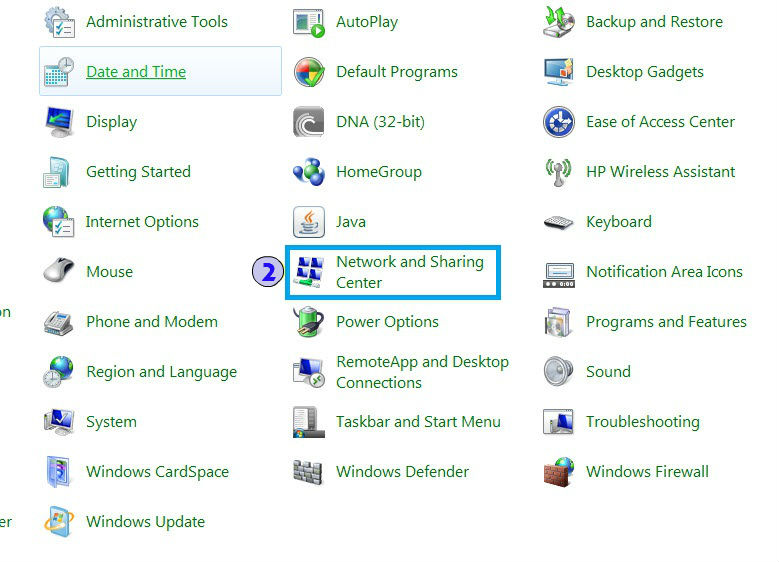
Click '''Network and Sharing Center'''. | |||
[[File:Win7-l2tp2.jpg|border]] | |||
== STEP 3 == | |||
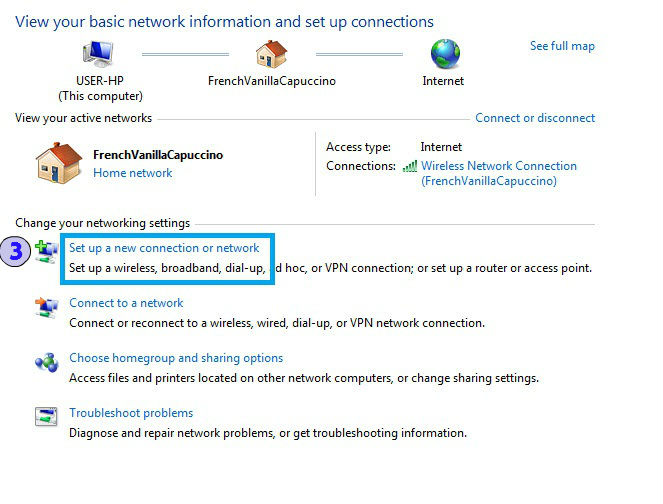
Click '''Setup a new connection or network''''. | |||
[[File:Win7-l2tp3.jpg|border]] | |||
==STEP 4 == | |||
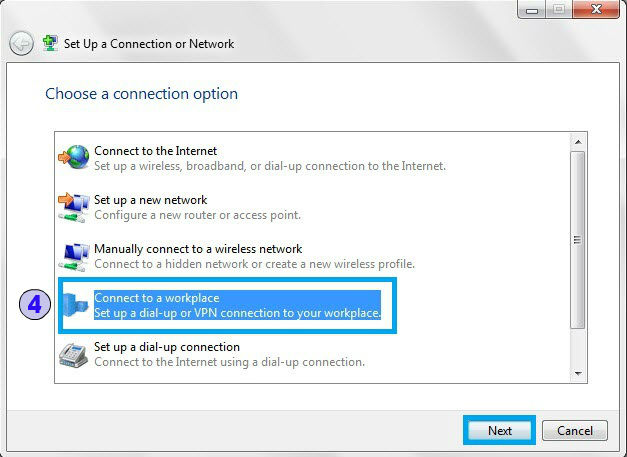
Select '''Connect to a workplace''' then click '''Next'''. | |||
[[File:Win7-l2tp4.jpg|border]] | |||
== STEP 5 == | |||
Click Use my Internet Connection (VPN) | |||
[[File:Win7-l2tp5.jpg|border]] | |||
== STEP 6 == | |||
For '''Internet address''' field, type in '''GTX1.ASTRILL.NET''', then type '''ASTRILL L2TP''' in '''Destination Name'''. Select Don't connect now; just set it up so I can connect later | |||
[[File:Win7-l2tp6.jpg|border]] | |||
== STEP 7 == | |||
Type your Astrill login details, your email as your '''Username''' and your Astrill account '''Password''' then click '''Create'''. | |||
[[File:Win7-l2tp7.jpg|border]] | |||
== Step 8 == | |||
Click '''Close'''. | |||
[[File:Win7-l2tp8.jpg|border]] | |||
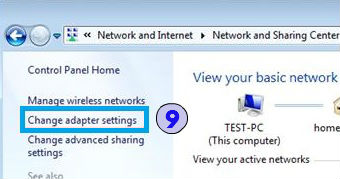
== STEP 9 == | |||
In the '''Network and Sharing Center''', click '''Change Adapter Settings'''. | |||
[[File:Win7-l2tp9.jpg|border]] | |||
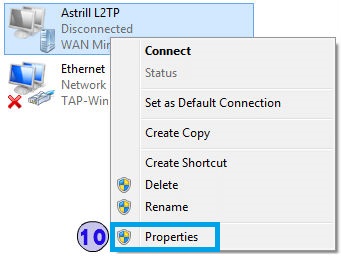
== STEP 10== | |||
Locate the '''Astrill L2TP''' connection, right-click and choose '''Properties'''. | |||
[[File:Win7-l2tp10.jpg|border]] | |||
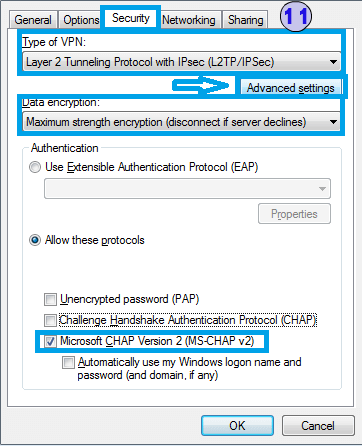
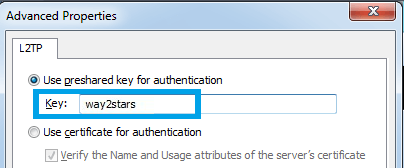
== STEP 11 == | |||
Go to '''Security''' tab, set '''Type of VPN''' to '''Layer 2 Tunneling Protocol with IPSec'''. | |||
Set Data Encryption to Maximum Strength | |||
Select Allow these protocols, and ensure that only Microsoft CHAP Version 2 is selected. | |||
Click the Advanced settings button at the top and type '''way2stars''' as the '''Key''' then click '''OK'''. | |||
[[File:Win7-l2tp12.png|border]] | |||
[[File:Win7-l2tp12.2.png|border]] | |||
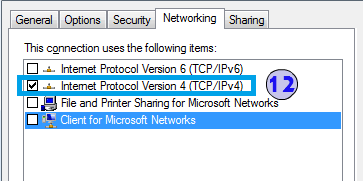
== STEP 12 == | |||
Click the '''Networking''' Tab and ensure that the only thing checked is '''Internet Protocol Version 4''' (IPv4) then click '''OK'''. | |||
[[File:Win7-l2tp13.png|border]] | |||
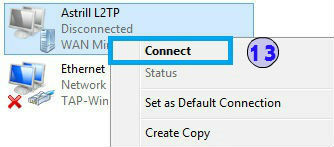
== STEP 13 == | |||
You can right click from '''Astrill L2TP''' connection now and select '''Connect''' to connect to VPN. | |||
[[File:Win7-l2tp133.jpg|border]] | |||
Now you can check your IP address here: https://www.astrill.com/what-is-my-ip. If it shows an Astrill IP, you're connected to VPN successfully and start surfing the internet. | |||
Latest revision as of 00:37, 1 December 2020
Attention! L2TP/IPSEC protocol won't be supported by Astrill after 1st January, 2021.
STEP 1
Click Start button, then select Control Panel from the menu.
STEP 2
Click Network and Sharing Center.
STEP 3
Click Setup a new connection or network'.
STEP 4
Select Connect to a workplace then click Next.
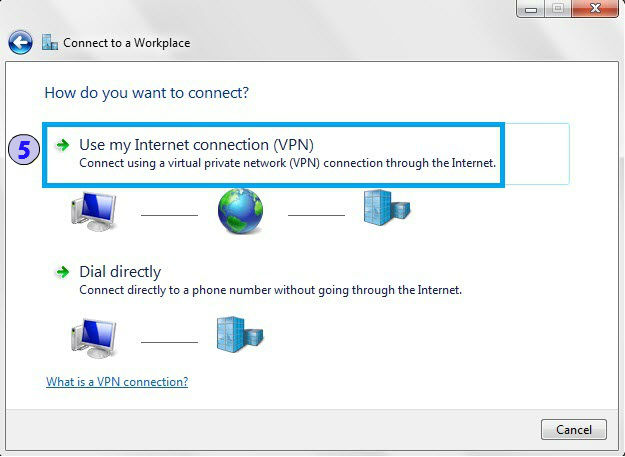
STEP 5
Click Use my Internet Connection (VPN)
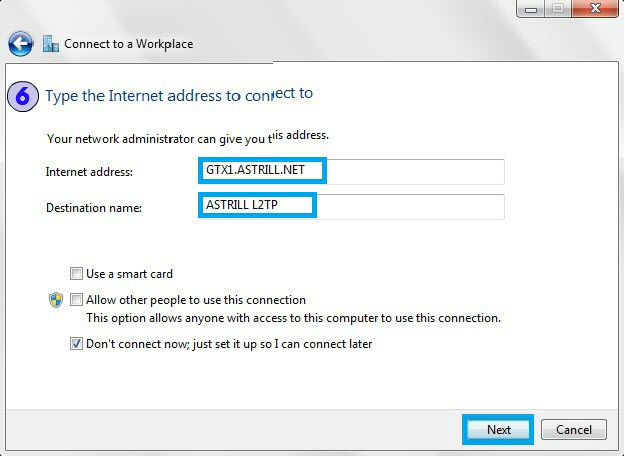
STEP 6
For Internet address field, type in GTX1.ASTRILL.NET, then type ASTRILL L2TP in Destination Name. Select Don't connect now; just set it up so I can connect later
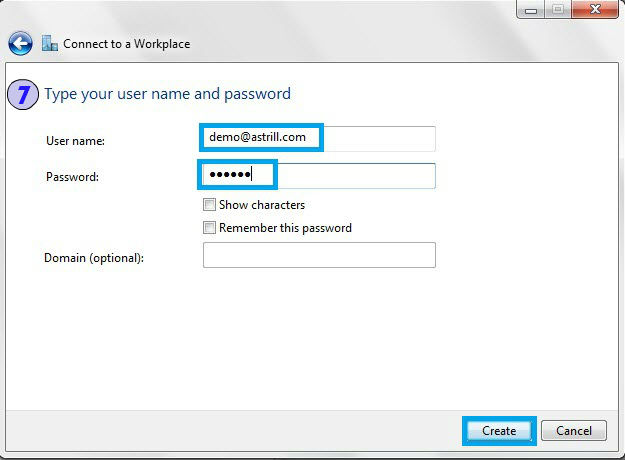
STEP 7
Type your Astrill login details, your email as your Username and your Astrill account Password then click Create.
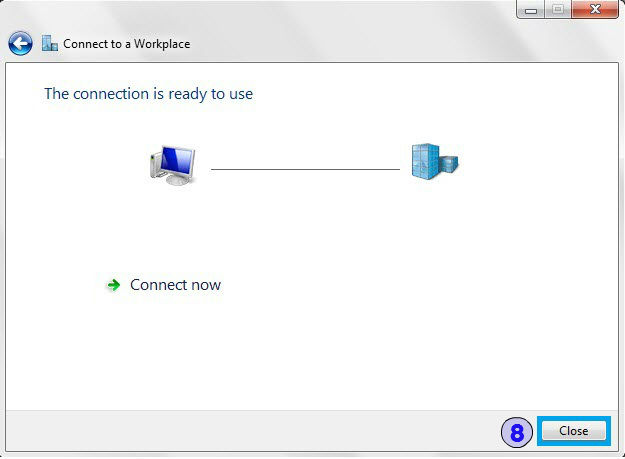
Step 8
Click Close.
STEP 9
In the Network and Sharing Center, click Change Adapter Settings.
STEP 10
Locate the Astrill L2TP connection, right-click and choose Properties.
STEP 11
Go to Security tab, set Type of VPN to Layer 2 Tunneling Protocol with IPSec. Set Data Encryption to Maximum Strength Select Allow these protocols, and ensure that only Microsoft CHAP Version 2 is selected. Click the Advanced settings button at the top and type way2stars as the Key then click OK.
STEP 12
Click the Networking Tab and ensure that the only thing checked is Internet Protocol Version 4 (IPv4) then click OK.
STEP 13
You can right click from Astrill L2TP connection now and select Connect to connect to VPN.
Now you can check your IP address here: https://www.astrill.com/what-is-my-ip. If it shows an Astrill IP, you're connected to VPN successfully and start surfing the internet.
