Astrill Setup Manual:How to configure L2TP/IPSec with built-in client on Mac OS X: Difference between revisions
No edit summary |
No edit summary |
||
| (One intermediate revision by the same user not shown) | |||
| Line 1: | Line 1: | ||
=='''STEP 1'''== | |||
Click on '''System Preferences''' icon in dock. | |||
- | [[File:N.mac_l2tp1.jpg|border]] | ||
=='''STEP 2'''== | |||
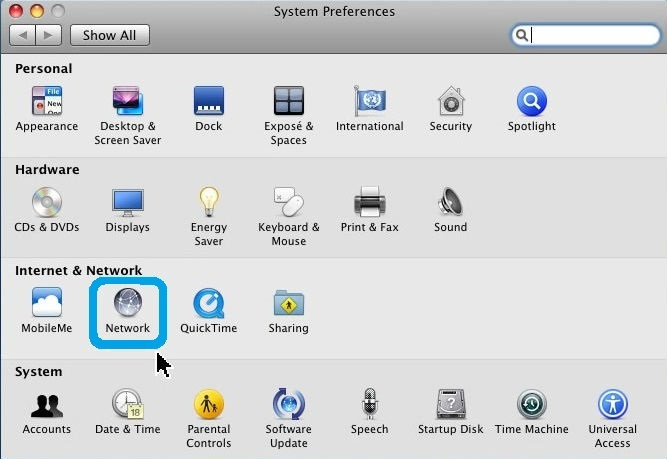
On '''System Preferences''' window, under '''Internet & Network''', click on '''Network''' icon. | |||
[[File:N.mac_l2tp2.jpg|border]] | |||
=='''STEP 3'''== | |||
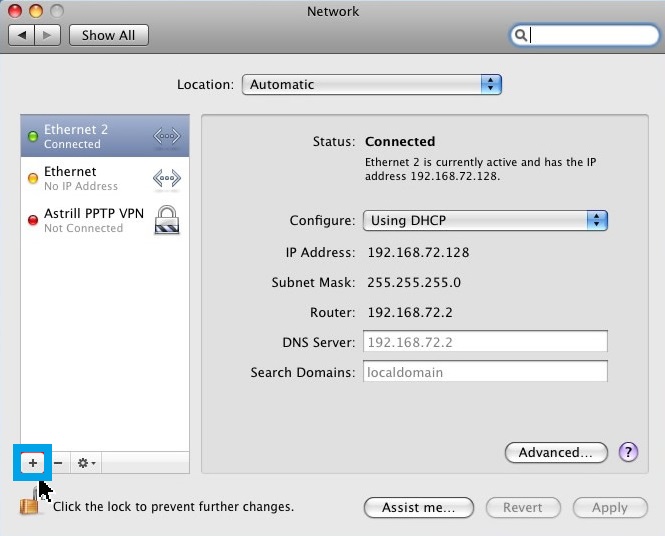
On '''Network''' window, click the '''plus (+)''' button to create L2TP VPN connection. | |||
[[File:N.mac_l2tp3.jpg|border]] | |||
=='''STEP 4'''== | |||
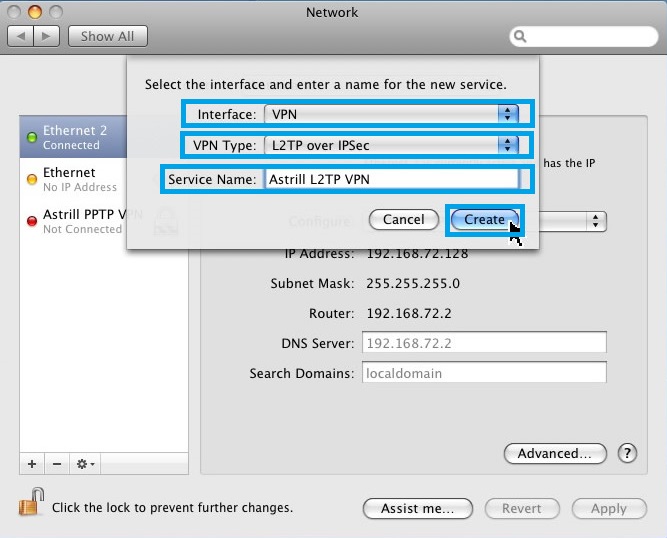
Fill out the required info: | |||
* '''Interface''', select '''VPN''': | |||
* '''VPN Type''': select '''L2TP over IPsec''' | |||
* '''Service Name''': type in '''Astrill L2TP VPN'''. | |||
When done, click on '''Create''' button. | |||
[[File:N.mac_l2tp4.jpg|border]] | |||
=='''STEP 5'''== | |||
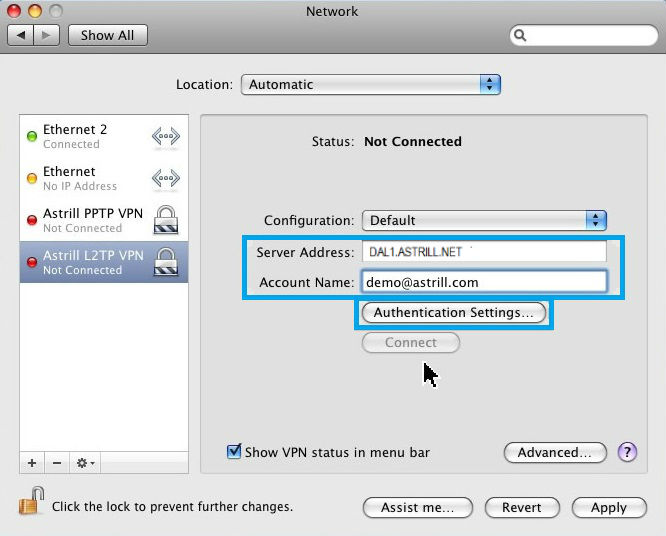
On '''Network''' screen, fill our required info: | |||
* '''Server Name''': See [https://members.astrill.com/servers-list.php Servers List] | |||
* '''Account Name''': Your Astrill username | |||
When done, click on '''Authentication Settings...''' button. | |||
[[File:N.mac_l2tp5.jpg|border]] | |||
=='''STEP 6'''== | |||
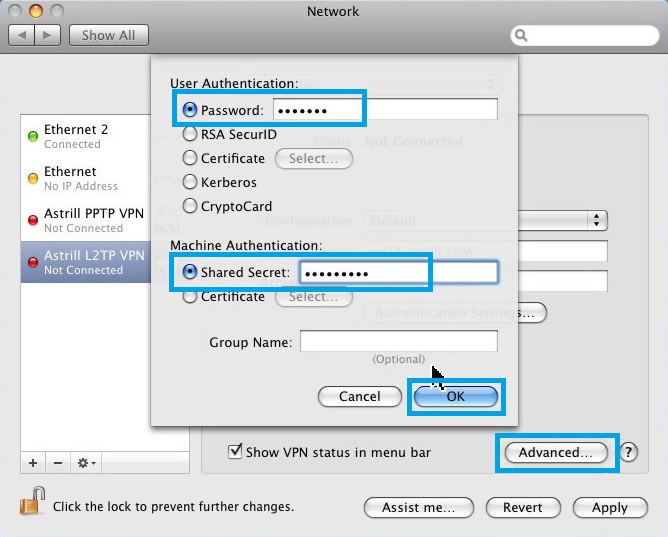
For '''User Authentication''', select '''Password''', and enter your '''Astrill VPN account''' password. | |||
For '''Machine Authentication''', select '''Shared Secret''', and enter '''way2stars'''. | |||
When done, click on '''OK''' button, then click on '''Advanced'''... button. | |||
[[File:N.mac_l2tp6.jpg|border]] | |||
[[File: | |||
=='''STEP 7'''== | |||
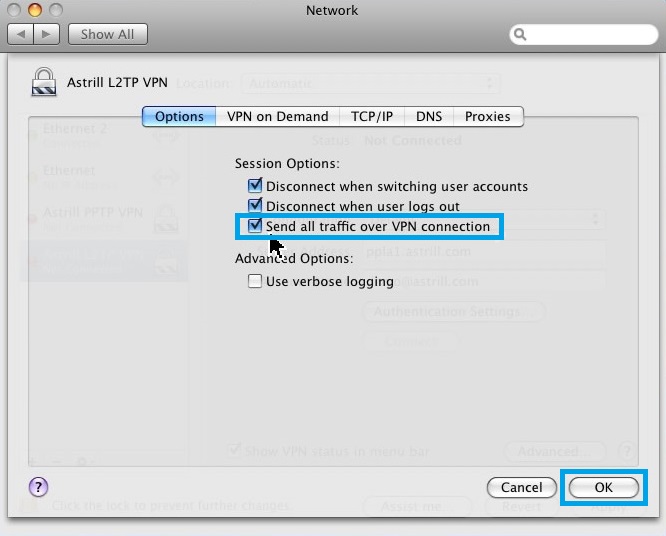
Tick the box '''Send all traffic over VPN connection''', then click on '''OK''' button. | |||
[[File:N.mac_l2tp7.jpg|border]] | |||
[[File: | |||
=='''STEP 8'''== | |||
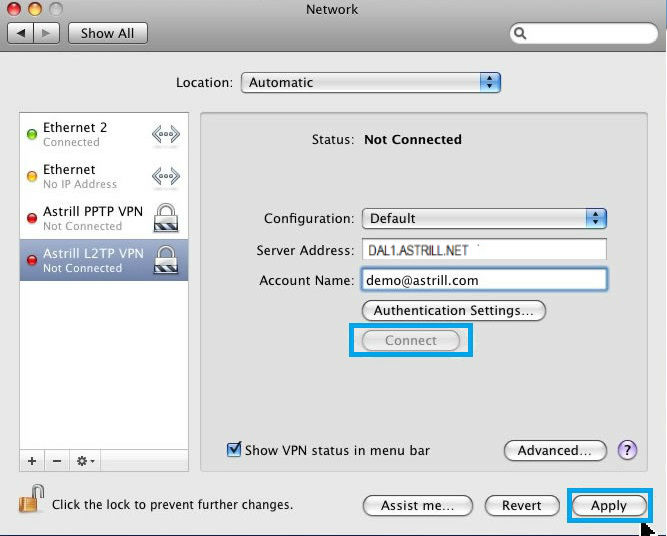
Click on '''Apply''' button, then to connect to Astrill L2TP VPN, click on '''Connect''' button. | |||
[[File:N.mac_l2tp8.jpg|border]] | |||
[[File: | |||
---- | ---- | ||
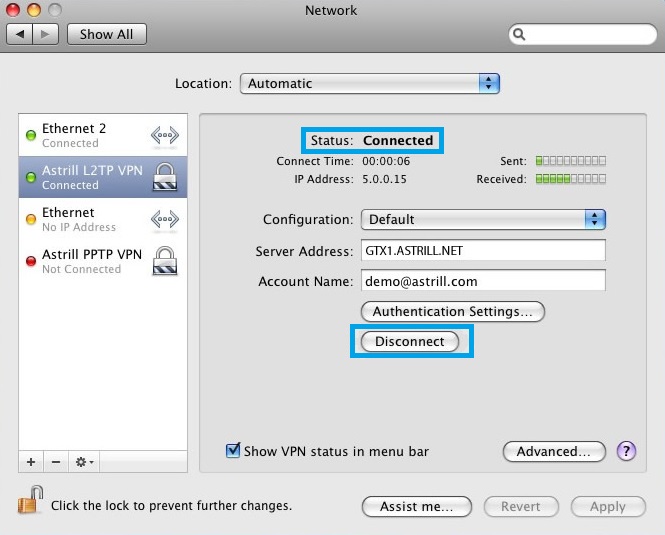
9. Once you are connected, you will see '''Status: Connected''', and to disconnect from Astrill L2TP VPN, simply click on '''Disconnect''' button. | 9. Once you are connected, you will see '''Status: Connected''', and to disconnect from Astrill L2TP VPN, simply click on '''Disconnect''' button. | ||
[[File: | |||
[[File:N.mac_l2tp9.jpg|border]] | |||
---- | ---- | ||
Revision as of 03:25, 30 June 2017
STEP 1
Click on System Preferences icon in dock.
STEP 2
On System Preferences window, under Internet & Network, click on Network icon.
STEP 3
On Network window, click the plus (+) button to create L2TP VPN connection.
STEP 4
Fill out the required info:
- Interface, select VPN:
- VPN Type: select L2TP over IPsec
- Service Name: type in Astrill L2TP VPN.
When done, click on Create button.
STEP 5
On Network screen, fill our required info:
- Server Name: See Servers List
- Account Name: Your Astrill username
When done, click on Authentication Settings... button.
STEP 6
For User Authentication, select Password, and enter your Astrill VPN account password.
For Machine Authentication, select Shared Secret, and enter way2stars.
When done, click on OK button, then click on Advanced... button.
STEP 7
Tick the box Send all traffic over VPN connection, then click on OK button.
STEP 8
Click on Apply button, then to connect to Astrill L2TP VPN, click on Connect button.
9. Once you are connected, you will see Status: Connected, and to disconnect from Astrill L2TP VPN, simply click on Disconnect button.
NOTE: When using PPTP/L2TP/IPSec VPN over 3G connection, make sure proxy settings are disabled. As it's likely these protocols can't work over proxy.

