Astrill Setup Manual:How to configure OpenVPN on Tomato firmware flashed Routers: Difference between revisions
No edit summary |
|||
| (10 intermediate revisions by 2 users not shown) | |||
| Line 1: | Line 1: | ||
== STEP 1 == | == STEP 1 - OpenVPN certificates == | ||
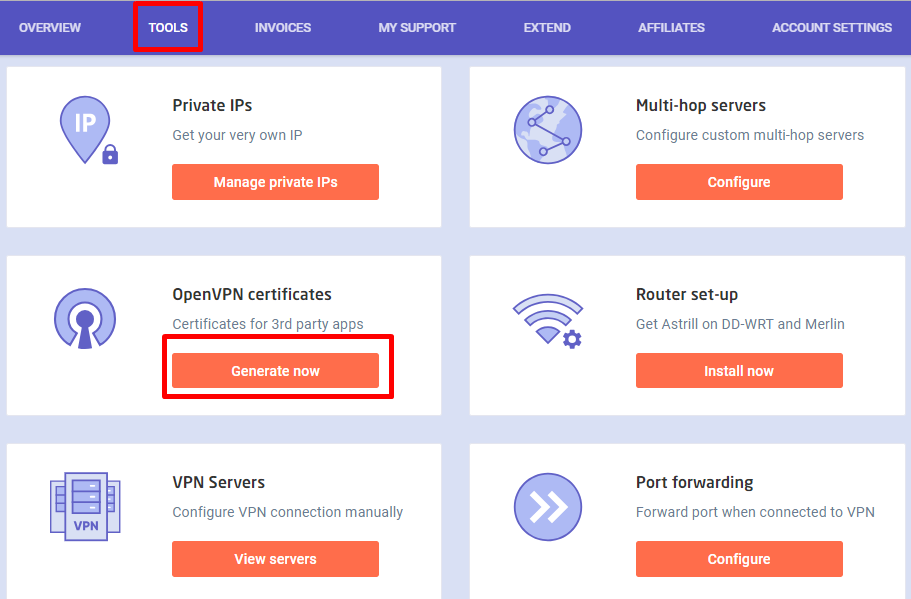
Goto '''Members Area => TOOLS => OpenVPN certificates generation =>''' https://members.astrill.com/tools/openvpn-certificates | |||
[[File: | [[File:Tomato6464.png]] | ||
== STEP 2 - Create new certificate == | |||
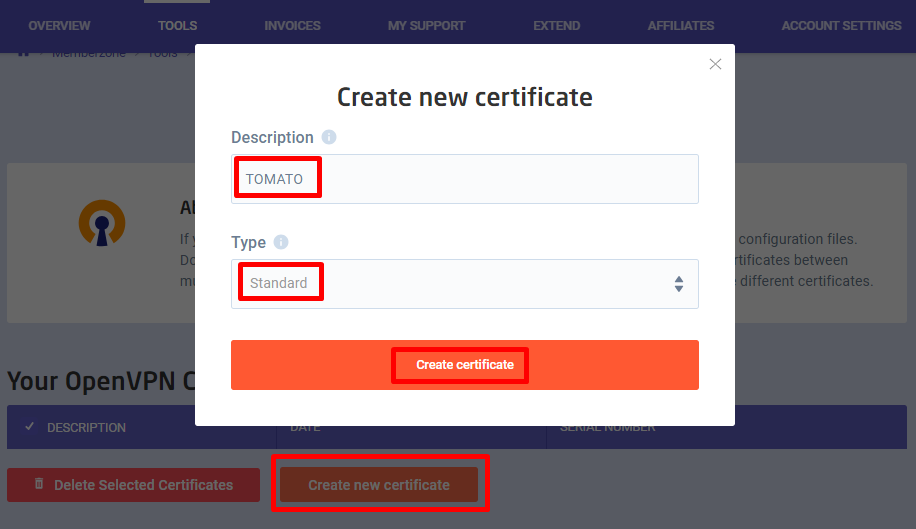
Under "Create new certificate" section, enter "TOMATO" for certificate description and Select "Standard" under type, then click on "Create certificate" button. | |||
[[File:Tomato6161.png]] | |||
== STEP 3 - Download certificate == | |||
== STEP 3 == | |||
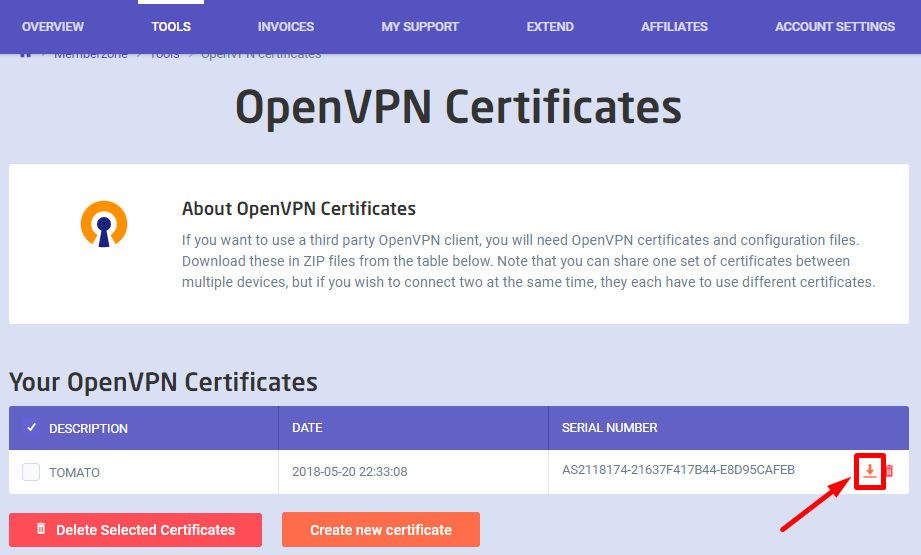
After the certificate has been created, click on "Download" button to save the configuration file to your desktop | After the certificate has been created, click on "Download" button to save the configuration file to your desktop | ||
[[File: | [[File:Tomato6262.png]] | ||
== STEP 4 == | == STEP 4 - Select VPN Server == | ||
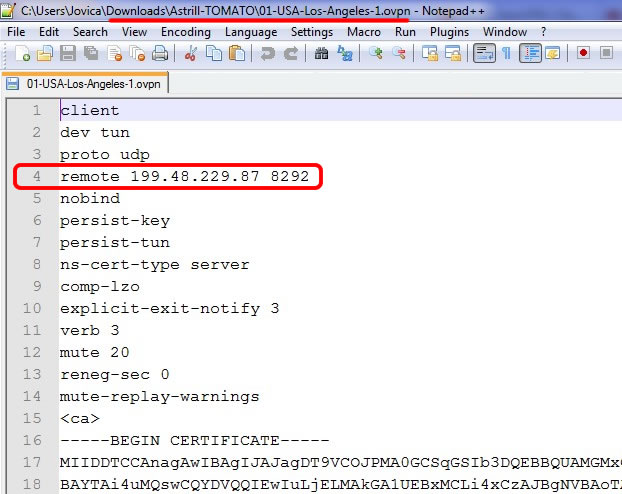
After you unpack the config file, pick a server you would like to be connected to, and then open the OVPN config file in your text editor. | After you unpack the config file, pick a server you would like to be connected to, and then open the OVPN config file in your text editor. | ||
| Line 27: | Line 24: | ||
== STEP 5 == | == STEP 5 - Locate VPN server details == | ||
Here you will see IP address and Port for the server and certificate keys below. | Here you will see IP address and Port for the server and certificate keys below. | ||
| Line 34: | Line 31: | ||
== STEP 6 == | == STEP 6 - Configure OpenVPN server on Tomato router == | ||
Open Tomato web admin, and then navigate to "VPN Tunneling > OpenVPN Client" section (http://192.168.1.1/vpn-client.asp). | Open Tomato web admin, and then navigate to "VPN Tunneling > OpenVPN Client" section (http://192.168.1.1/vpn-client.asp). | ||
| Line 42: | Line 39: | ||
For "Server Address" enter "199.48.229.87" or another IP address which you can find inside OVPN config files. | For "Server Address" enter "199.48.229.87" or another IP address which you can find inside OVPN config files. | ||
For "Port" enter "8292", | For "Port" enter "8292", | ||
The server port is the same for all servers. | The server port is the same for all servers. Set "Extra HMAC authorization (tls-auth)" to "Outgoing (1)". | ||
[[File:Tomato-openvpn-006.jpg]] | [[File:Tomato-openvpn-006.jpg]] | ||
== STEP 7 == | == STEP 7 - Configure OpenVPN certificates on Tomato router == | ||
Click on "Keys" tab and copy/paste certificate keys from OVPN config file just like in the screenshot. | Click on "Keys" tab and copy/paste certificate keys from OVPN config file just like in the screenshot. | ||
For "Certificate Authority" copy/ | |||
For "Client Certificate" copy/ | For '''"Static Key"''' copy text between '''<tls-auth>...</tls-auth>''' tags. | ||
For "Client Key" copy/ | |||
For '''"Certificate Authority"''' copy text between '''<ca>...</ca>''' tags. | |||
For '''"Client Certificate"''' copy text between '''<cert>...</cert>''' tags. | |||
For '''"Client Key"''' copy text between '''<key>...</key>''' tags. | |||
When you are done click on "Save" button below to save the settings you just entered. | When you are done click on "Save" button below to save the settings you just entered. | ||
| Line 59: | Line 63: | ||
== STEP 8 == | == STEP 8 - Start OpenVPN on Tomato router == | ||
Click on "Status" tab, and then click on "Start Now" button to start Astrill OpenVPN connection. | Click on "Status" tab, and then click on "Start Now" button to start Astrill OpenVPN connection. | ||
| Line 66: | Line 70: | ||
== STEP 9 == | == STEP 9 - Check Status == | ||
Once you are connected, the status will change and you will see general statistics table. | Once you are connected, the status will change and you will see general statistics table. | ||
| Line 73: | Line 77: | ||
== STEP 10 == | == STEP 10 - Check IP address == | ||
After 10 seconds of clicking on "Start Now" button you can check your IP address on (https://www.astrill.com/ | After 10 seconds of clicking on "Start Now" button you can check your IP address on (https://www.astrill.com/what-is-my-ip). | ||
If you run into any problems, please try the following: | If you run into any problems, please try the following: | ||
1) Reload router defaults settings | 1) Reload router defaults settings | ||
2) Connect ADSL modem to WAN port to router | 2) Connect ADSL modem to WAN port to router | ||
3) Install Astrill on your router. | 3) Install Astrill on your router. | ||
Latest revision as of 20:45, 20 May 2018
STEP 1 - OpenVPN certificates
Goto Members Area => TOOLS => OpenVPN certificates generation => https://members.astrill.com/tools/openvpn-certificates
STEP 2 - Create new certificate
Under "Create new certificate" section, enter "TOMATO" for certificate description and Select "Standard" under type, then click on "Create certificate" button.
STEP 3 - Download certificate
After the certificate has been created, click on "Download" button to save the configuration file to your desktop
STEP 4 - Select VPN Server
After you unpack the config file, pick a server you would like to be connected to, and then open the OVPN config file in your text editor.
STEP 5 - Locate VPN server details
Here you will see IP address and Port for the server and certificate keys below.
STEP 6 - Configure OpenVPN server on Tomato router
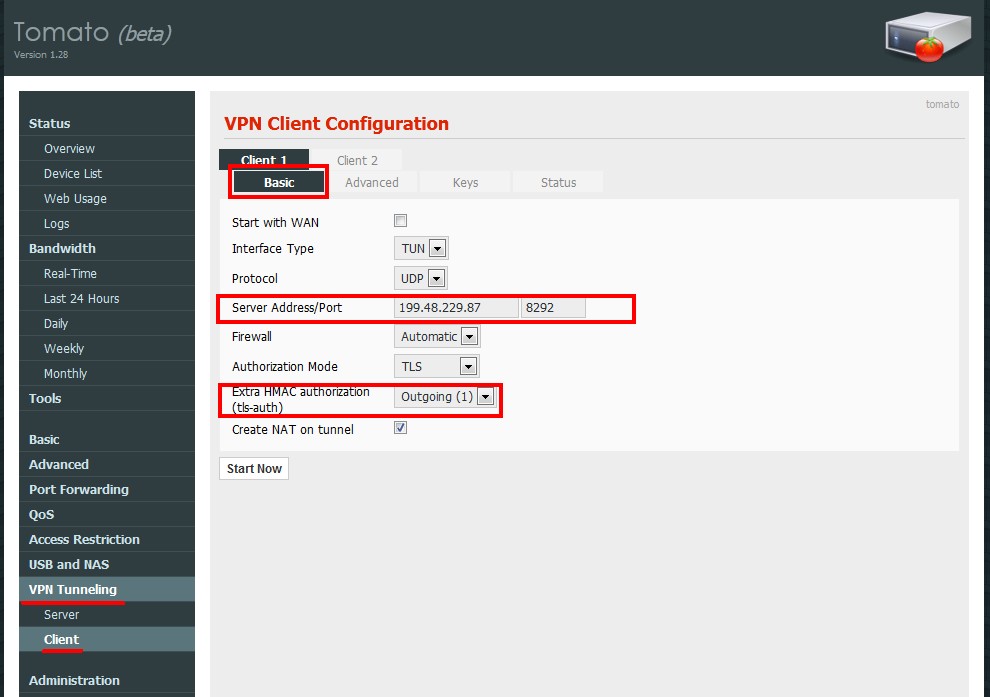
Open Tomato web admin, and then navigate to "VPN Tunneling > OpenVPN Client" section (http://192.168.1.1/vpn-client.asp).
Click on "Client 1" tab, then click on "Basic" tab to configure the server.
For "Server Address" enter "199.48.229.87" or another IP address which you can find inside OVPN config files. For "Port" enter "8292", The server port is the same for all servers. Set "Extra HMAC authorization (tls-auth)" to "Outgoing (1)".
STEP 7 - Configure OpenVPN certificates on Tomato router
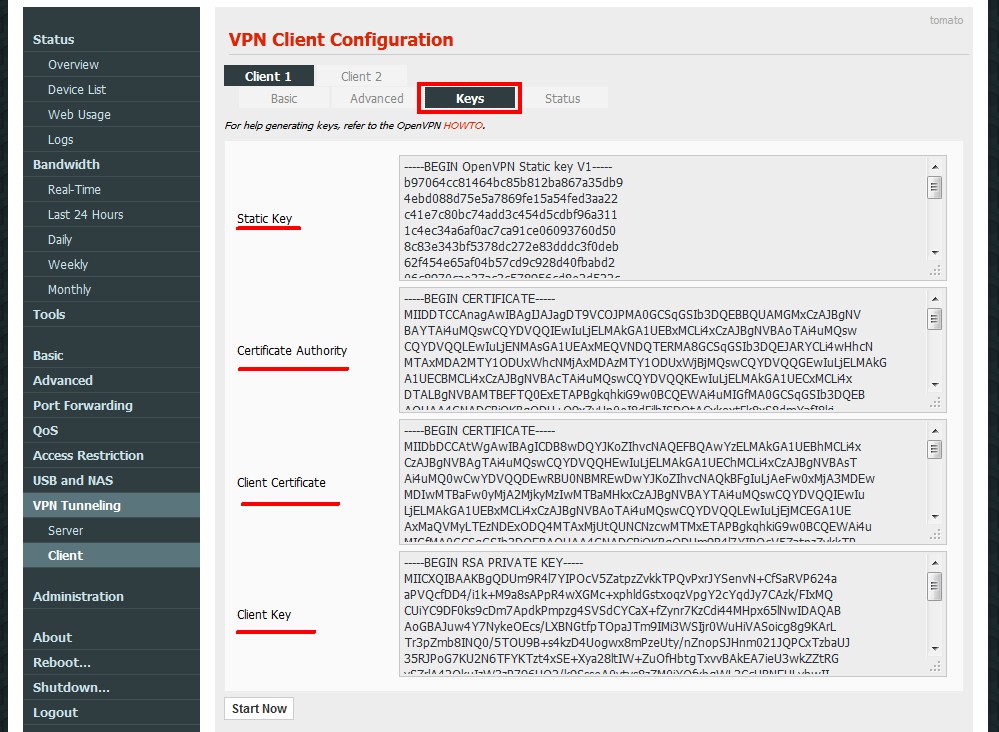
Click on "Keys" tab and copy/paste certificate keys from OVPN config file just like in the screenshot.
For "Static Key" copy text between <tls-auth>...</tls-auth> tags.
For "Certificate Authority" copy text between <ca>...</ca> tags.
For "Client Certificate" copy text between <cert>...</cert> tags.
For "Client Key" copy text between <key>...</key> tags.
When you are done click on "Save" button below to save the settings you just entered.
STEP 8 - Start OpenVPN on Tomato router
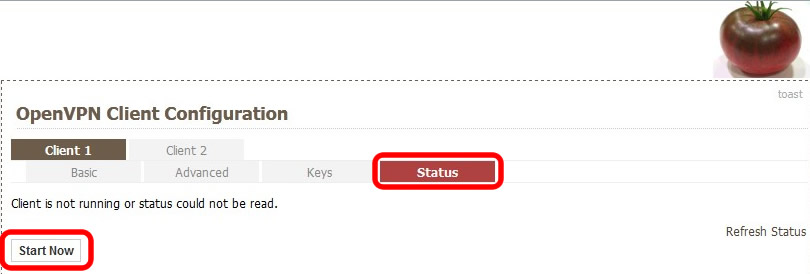
Click on "Status" tab, and then click on "Start Now" button to start Astrill OpenVPN connection.
STEP 9 - Check Status
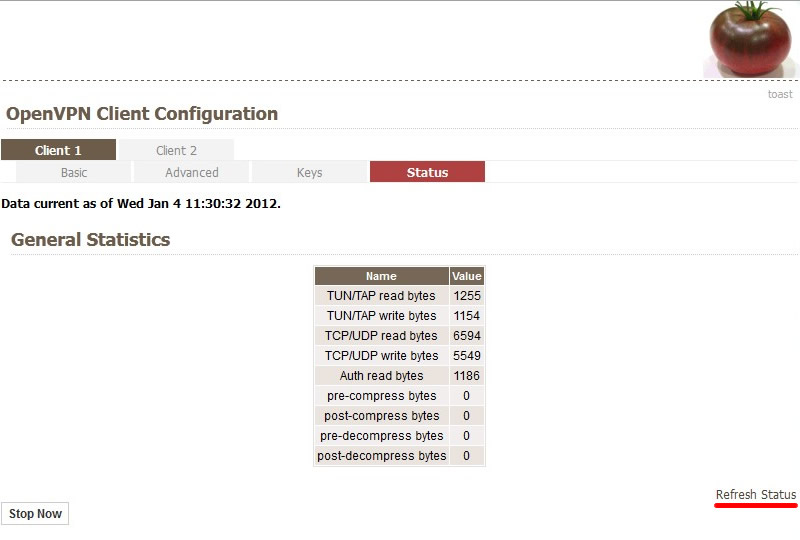
Once you are connected, the status will change and you will see general statistics table.
STEP 10 - Check IP address
After 10 seconds of clicking on "Start Now" button you can check your IP address on (https://www.astrill.com/what-is-my-ip).
If you run into any problems, please try the following:
1) Reload router defaults settings
2) Connect ADSL modem to WAN port to router
3) Install Astrill on your router.
