Astrill Setup Manual:How to flush DNS cache on Windows Vista: Difference between revisions
Jump to navigation
Jump to search
No edit summary |
No edit summary |
||
| Line 3: | Line 3: | ||
[[File:Startup_menu.jpg]] | [[File:Startup_menu.jpg]] [[File:Run_as_admin.jpg]] | ||
| Line 11: | Line 11: | ||
# In the search results that come up, right click on '''cmd'''. | # In the search results that come up, right click on '''cmd'''. | ||
# Choose '''Run as administrator'''. When the screen flashes and asks for permission, accept it. | # Choose '''Run as administrator'''. When the screen flashes and asks for permission, accept it. | ||
== STEP 2 - Flush DNS cache == | |||
[[File:Flush_dns.jpg]] [[File:Confirmation.jpg]] | |||
# In the command prompt, type in '''ipconfig /flushdns''' then press Enter key. | |||
# This is a confirmation that you have successfully flushed the DNS resolver cache. | |||
Revision as of 02:20, 9 October 2012
STEP 1 - Run Command Prompt as Admin
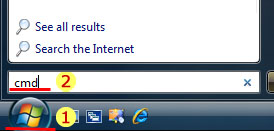
- Click on Windows Startup menu.
- Type cmd (do not hit enter).
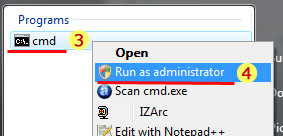
- In the search results that come up, right click on cmd.
- Choose Run as administrator. When the screen flashes and asks for permission, accept it.
STEP 2 - Flush DNS cache
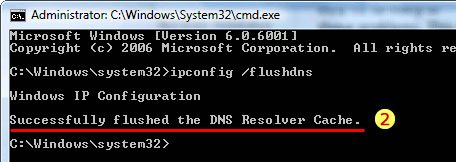
- In the command prompt, type in ipconfig /flushdns then press Enter key.
- This is a confirmation that you have successfully flushed the DNS resolver cache.


