Astrill Setup Manual:How to configure OpenVPN with Network Manager on Linux: Difference between revisions
No edit summary |
(→Step 6) |
||
| (6 intermediate revisions by 3 users not shown) | |||
| Line 1: | Line 1: | ||
1 | =='''Step 1'''== | ||
First open '''Terminal''', and use this command to '''install''' the '''OpenVPN''' Network Manager '''plugin''': | |||
'''''sudo apt-get install network-manager-openvpn openvpn''''' | '''''sudo apt-get install network-manager-openvpn openvpn''''' | ||
[[File: | [[File:N.linux ovpnnet1.jpg|border]] | ||
=='''Step 2'''== | |||
Login to '''Members area''', and '''create''' and download a '''certificate for OpenVPN with configuration files'''. Click on '''Members''', login to your account, then click '''VPN Services''', and then click on '''OpenVPN certificates generation'''. | |||
https://members.astrill.com/tools/openvpn-certificates | |||
[[File:N.linux ovpnnet2.jpg|border]] | |||
=='''Step 3'''== | |||
Open '''Astrill-ubuntu.zip''' file you just downloaded, and pick a server and extract the OVPN file (in this example 27-USA-Seattle-1.ovpn). | |||
[[File:N.linux ovpnnet3.1.jpg|border]] | |||
[[File: | |||
| Line 38: | Line 36: | ||
[[File: | [[File:N.linux ovpnnet3.2.jpg|border]] | ||
=='''Step 4'''== | |||
Open '''Network Manager''', and then click on '''Add''' button to create new connection. | |||
[[File: | [[File:N.linux ovpnnet4.1.jpg|border]] | ||
Select '''OpenVPN''' for connection type, and then click on '''Create...''' button to create new OpenVPN connection. | Select '''OpenVPN''' for connection type, and then click on '''Create...''' button to create new OpenVPN connection. | ||
[[File: | [[File:N.linux ovpnnet4.2.jpg|border]] | ||
=='''Step 5'''== | |||
On '''VPN''' tab, you need to set the following: | |||
'''Connection name:''' ''Astrill VPN'' | |||
'''Gateway:''' ''<VPN Server IP address>'' | |||
'''Authentication Type:''' ''Certificates (TLS)'' | |||
'''User Certificate:''' ''user.crt'' | |||
'''CA Certificate:''' ''ca.crt'' | |||
'''Private Key:''' ''private.key'' | |||
Then click on '''Advanced...''' button for more configuration options. | Then click on '''Advanced...''' button for more configuration options. | ||
| Line 75: | Line 75: | ||
[[File: | [[File:N.linux ovpnnet5.1.jpg|border]] | ||
On '''General''' tab, you need to set the following: | |||
'''Use custom gateway port:''' ''tick and set 8292'' | |||
'''Use LZO data compression:''' ''tick'' | |||
[[File:N.linux ovpnnet5.2.jpg|border]] | |||
On '''Security''' tab, you need to set the following: | |||
'''Cipher:''' ''BF-CBC'' | |||
'''HMAC Authentication:''' ''SHA-1'' | |||
[[File:N.linux ovpnnet5.3.jpg|border]] | |||
On '''TLS Authentication''' tab, you need to set the following: | |||
'''Use additional TSL authentication:''' ''ticked'' | |||
'''Key File:''' ''tls.key'' | |||
'''Key Direction:''' ''1'' | |||
[[File:N.linux ovpnnet5.4.jpg|border]] | |||
Once done, click on '''OK''' button and then click on '''Save''' button. | |||
=='''Step 6'''== | |||
Now we are ready to start Astrill OpenVPN connection. | |||
[[File:N.linux ovpnnet6.1.jpg|border]] | |||
Once OpenVPN connection is established you will see successful pop-up message. | |||
[[File: | [[File:N.linux ovpnnet6.2.jpg|border]] | ||
You can check and confirm your IP address. http://www.astrill.com/what-is-my-ip | |||
[[File:N.linux ovpnnet6.3.jpg|border]] | |||
---- | ---- | ||
Latest revision as of 18:23, 20 May 2018
Step 1
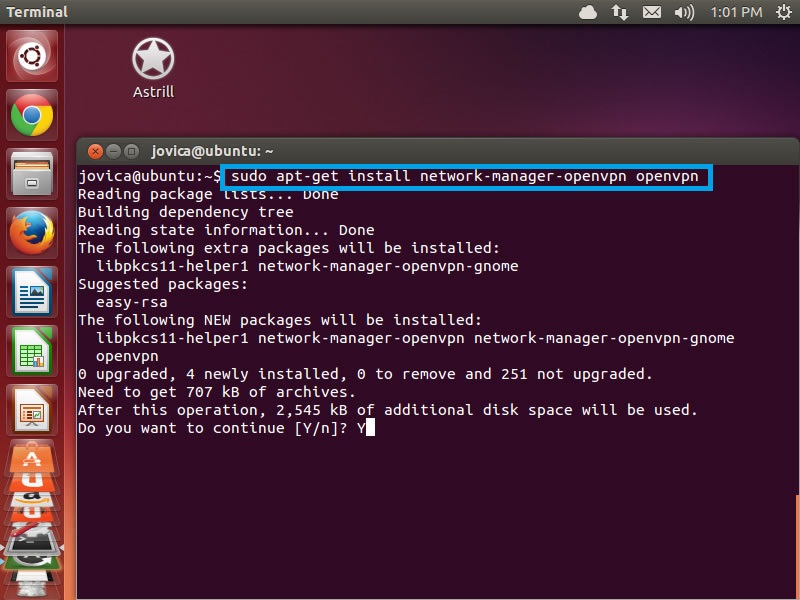
First open Terminal, and use this command to install the OpenVPN Network Manager plugin:
sudo apt-get install network-manager-openvpn openvpn
Step 2
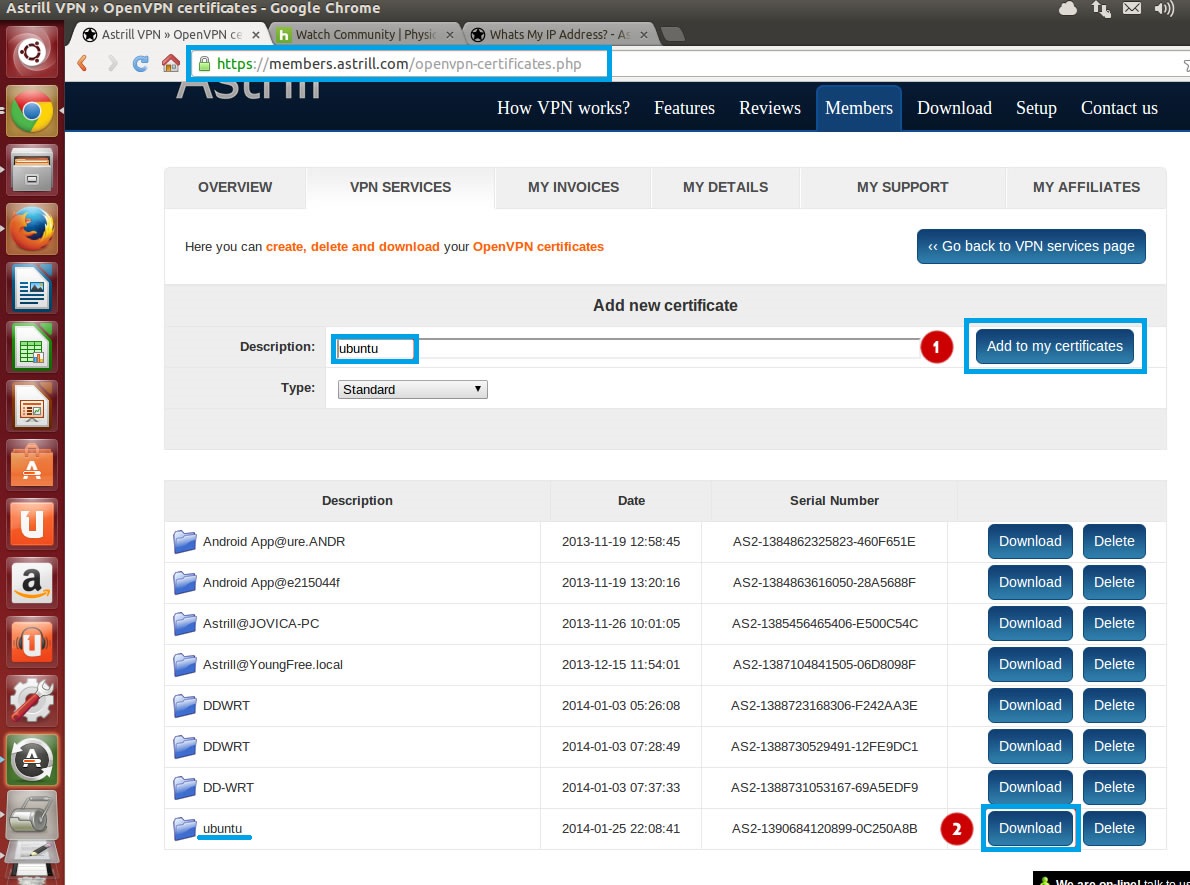
Login to Members area, and create and download a certificate for OpenVPN with configuration files. Click on Members, login to your account, then click VPN Services, and then click on OpenVPN certificates generation.
https://members.astrill.com/tools/openvpn-certificates
Step 3
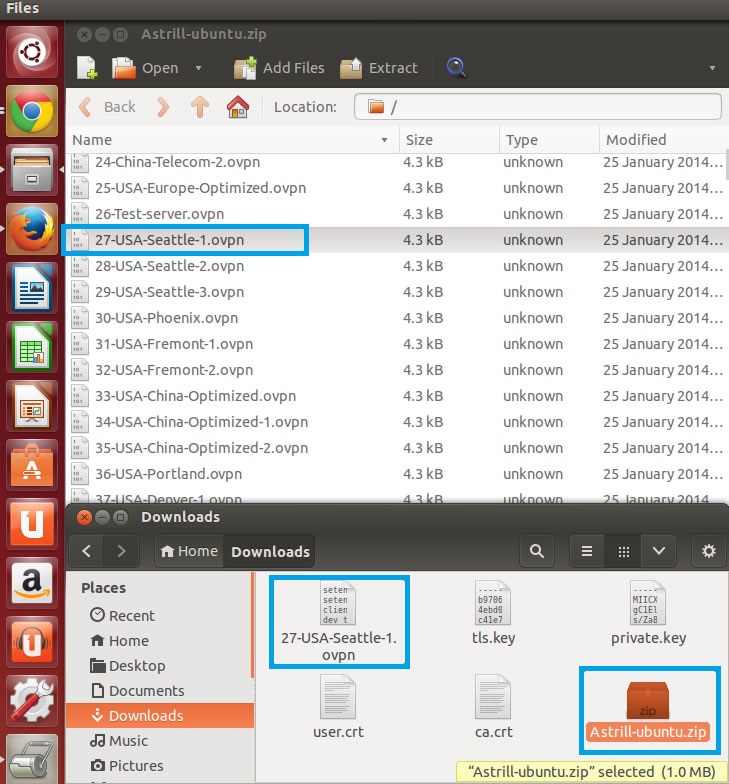
Open Astrill-ubuntu.zip file you just downloaded, and pick a server and extract the OVPN file (in this example 27-USA-Seattle-1.ovpn).
Then make 4 copies of 27-USA-Seattle-1.ovpn file, and rename them and edit them accordingly:
Text between <ca></ca> tags goes into ca.crt file
Text between <cert></cert> tags goes into user.crt file
Text between <key></key> tags goes into private.key file
Text between <tls-auth></tls-auth> tags goes into tls.key file
Step 4
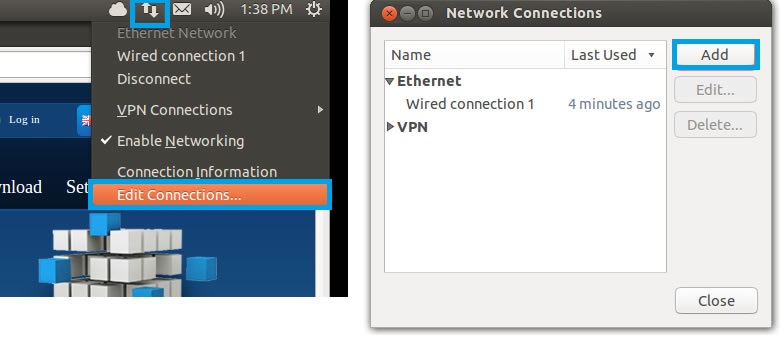
Open Network Manager, and then click on Add button to create new connection.
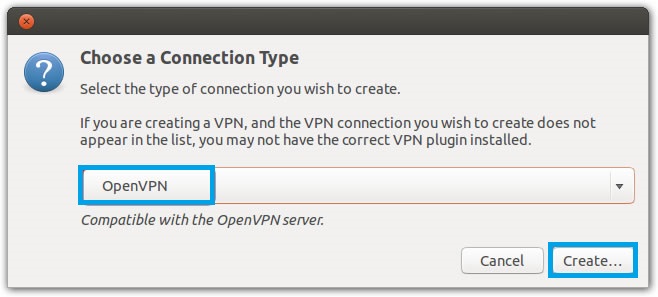
Select OpenVPN for connection type, and then click on Create... button to create new OpenVPN connection.
Step 5
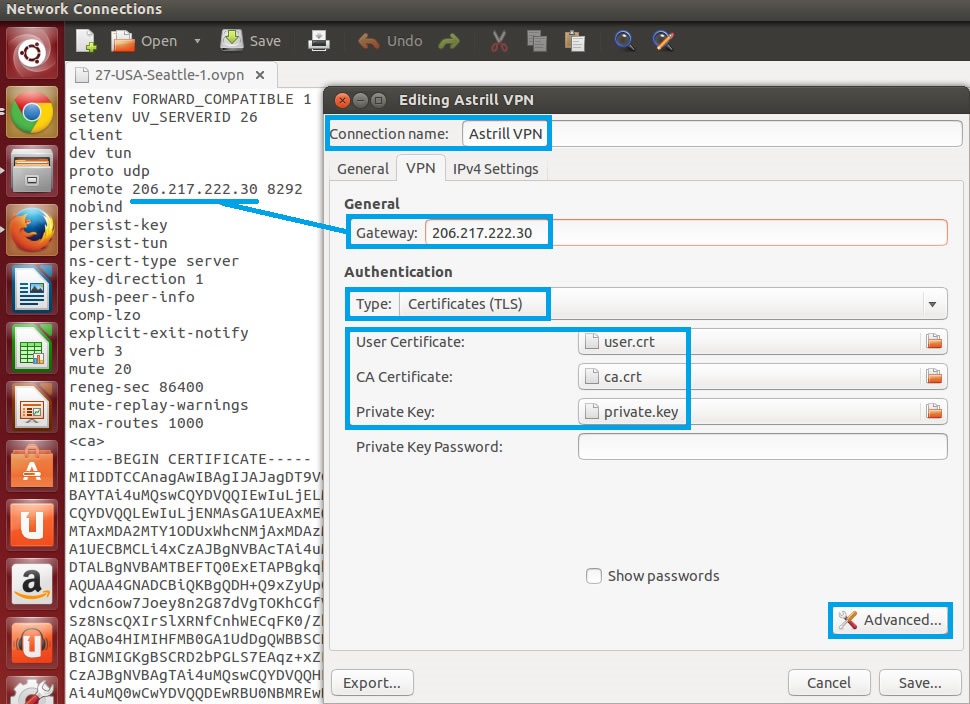
On VPN tab, you need to set the following:
Connection name: Astrill VPN
Gateway: <VPN Server IP address>
Authentication Type: Certificates (TLS)
User Certificate: user.crt
CA Certificate: ca.crt
Private Key: private.key
Then click on Advanced... button for more configuration options.
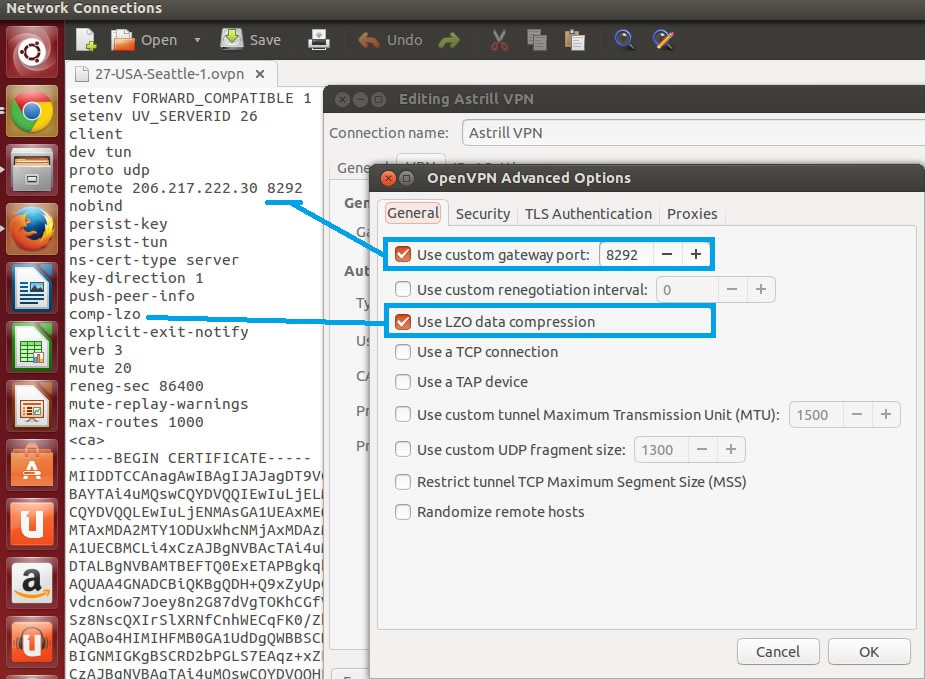
On General tab, you need to set the following:
Use custom gateway port: tick and set 8292
Use LZO data compression: tick
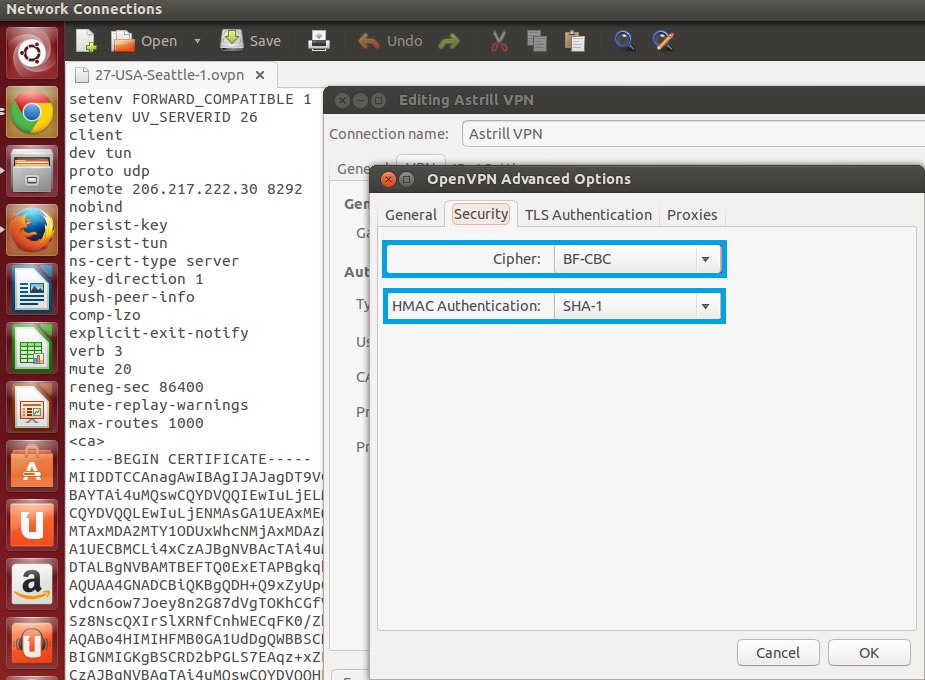
On Security tab, you need to set the following:
Cipher: BF-CBC
HMAC Authentication: SHA-1
On TLS Authentication tab, you need to set the following:
Use additional TSL authentication: ticked
Key File: tls.key
Key Direction: 1
Once done, click on OK button and then click on Save button.
Step 6
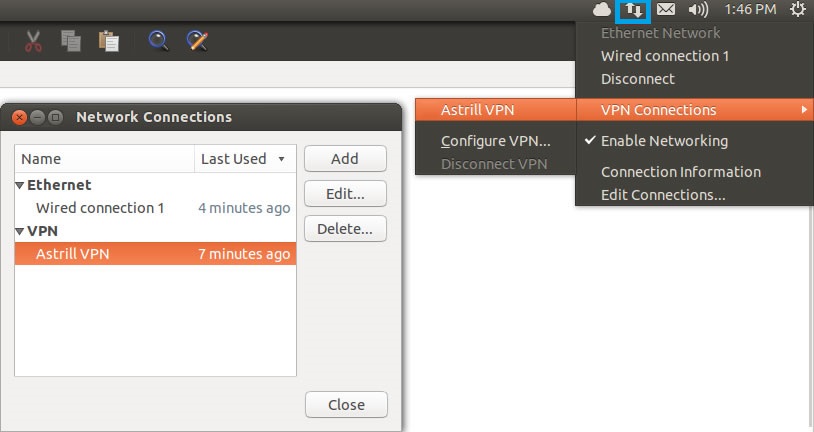
Now we are ready to start Astrill OpenVPN connection.
Once OpenVPN connection is established you will see successful pop-up message.
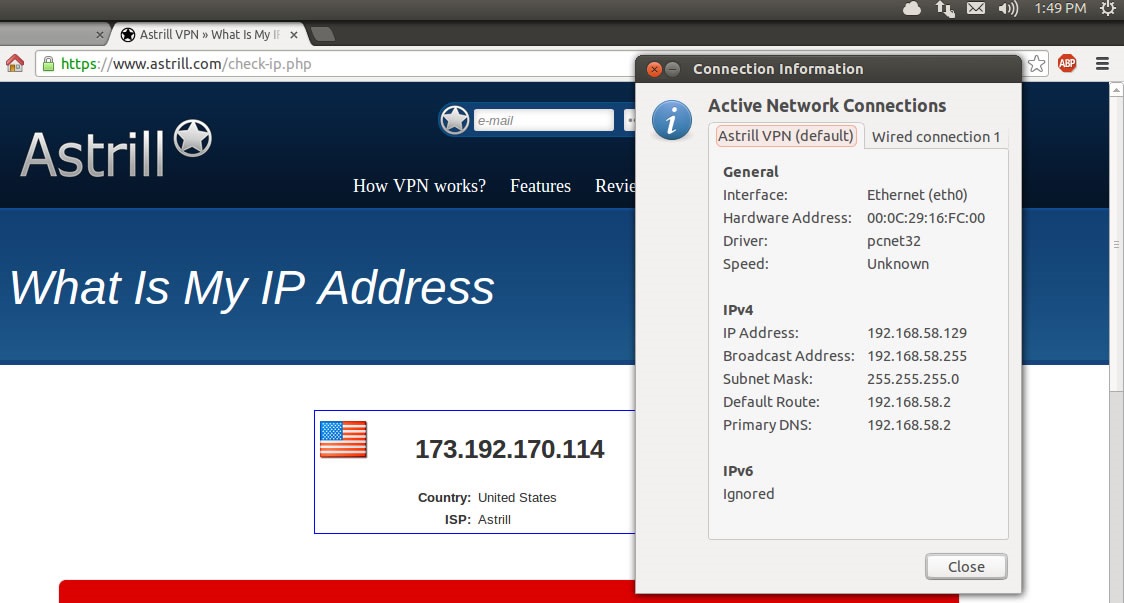
You can check and confirm your IP address. http://www.astrill.com/what-is-my-ip
